


jon.pearse
-
Posts
295 -
Joined
-
Last visited
-
Days Won
21
Posts posted by jon.pearse
-
-
Hi Daniel,
This is a very good question. I'm sure that many others have been in the same situation, where they want to produce a sets of documents/emails but not the embedded items that have been extracted from these items during the indexing process.
This can be done but it does require a few manual steps.
1) Create a tag of all of the items in your folder e.g. '01 - Items in folder'.
2) Search this tag, then go to the features facet and run a search on the Embedded folder.
3) You should now have 3 clusters. The intersection of the two searches shows the embedded items.
4) Right click on the embedded items and select 'Remove Tags...' and remove these items from your '01 - Items in folder' tag.
5) Now you are left with only documents and no embedded items.
If you have container files (PST and ZIP) still in the dataset at step 5, you can remove these easily by clicking on the 'Hide Irrelevant' button. Once done, you can export the items.
I hope this helps.
Regards
Jon
-
Hi Wm,
Thank you for taking the time to share your testing results with the group. These are indeed interesting results which show that performance can be affected by configuration settings.
Being from a Corporate environment, I have been involved in a lot of ED work. We used ABBYY RS v4 for OCR processing however, we did not do this automatically from Intella. Instead we exported the documents to be OCRed to a HOT folder on the ABBYY system where they were OCRed automatically, then we imported the text back into the case. The reason (more than anything) is that we had not got around to linking or setting up the two systems to work as one workflow. I guess the advantage in our case is that the Intella case can still be used while documents were being OCRed in ABBYY.
One advantage with RS v4 is that you can add processing stations which share the work load. We were OCRing large volumes of documents so we had the RS plus 4 or so processing stations. This really cuts down the time when processing large volumes of documents.
In terms of cost, we would purchased bulk page licenses, e.g. 1 million page license. This cost would be disbursed across the many jobs which required OCR work. There was no initial outlay to purchase RS v4.
I can say that the quality from RS v4 is very good. Unfortunately I have not used any other OCR tools so I cant comment on other products.
Regards
Jon
-
Hi Adam,
You are correct, currently the entire tag set is shown when removing tags. We have a ticket to improve the tagging feature in Connect which will include this issue.
-
Background
In earlier versions of Intella the capability to code documents in terms of legal review or e-discovery was limited. Because of the limited capability, such an exercise was difficult to undertake and caused limitations for the export of any coded metadata by the reviewer.
There were two main capability limitations with the earlier versions of Intella. The first is that tagging was performed 'flat' or on a single level basis. The second limitation is that the reviewer could not enter any metadata for a document into the case, apart from creating tags for each item of metadata the reviewer wanted to assign to a document. Such metadata for a legal review could be noting that a document is privileged, it is relevant, it is part of a certain issue etc. Given the large number of tags that can exist in a case, you can see how difficult it would be have been to isolate the coded metadata from the other data contained in the exported tag information.
With version 1.9 we have added features to our tagging capability that will let the reviewer setup a case so that documents can be reviewed and coded accordingly. Further, the columns which hold the coded metadata can be exported to a load file.
Setting up the case for review and coding
Once you have completed the filtering processes (e.g. keyword searches, date range filters, document types, de-duplication etc.) and have the dataset tagged and ready for review, we need to think about what coding options to include for the reviewer. For example, if the discovery was regarding a dispute between an employer and employee in regards to time management you may want to include the following coding options:- Privileged with Yes or No answers
- Relevant with Yes or No answers
- Issues - This field may contain several elements related to the issues. In this case these may be Contract, Time Sheets, Matters and Clients. Note that one document may be related to several elements and will need to be coded accordingly.
Using the example above, lets setup our tagging structure. The top level tags or Tag Group in this case will be Privileged, Relevant and Issues.
- Click on the Tag facet then right click anywhere in the white space where the tags are shown and select 'Create new tag'.
- Enter Privileged in the Tag name field then click the OK button.
- Do the same for the terms Relevant and Issues.
The three tags should look as shown below when complete.

The next step is adding child tags to the top level tags. These child tags will represent the options that the reviewer will select.- Again click on the Tag facet but this time right click on the Issues tag then select Create new tag inside "Issues". Type Client and click the OK button.
- Do the same and add Contract, Matters and Time Sheets in the Issues tag.
- Once done do the same for the Privileged tag and add Yes and No as child tags.
- Lastly do the same for the Relevant tag where you also add Yes and No as child tags.
The child tags should be sitting under their parent tag as shown in the image below. If it does then the tagging options have been setup.

Now we need to show the new top level tags in the Details table. Click on the button under the Timeline button which shows additional columns to add to the Details table. There you will see the three top level tags which we created. Place a check in the checkboxes so the columns can be shown in the Details table.
Once done close the Column Options window and you will see the three new columns in the Details table.
Document Review and Coding
When a document is being reviewed, the reviewer will now be able to apply coding to the document by way of tagging. In the example below, the reviewer has tagged (or effectively coded) this document as follows:- The document is not Privileged
- The document is Relevant
- The document relates to the following Issues: Client and Matters

Once the tagging is complete the coded metadata can be seen in the Details table. These three new columns and the metadata in those columns can also be exported in a load file.
Note: This article is designed to help you gain knowledge of how to use Intella 1.9 to code documents during a legal review. You should note that there are limitations to coding documents using this method. These limitations include the following:- It is not possible to specify that certain tags are mutually exclusive. For example, a reviewer can code a particular document as both privileged and not privileged.
- You cannot set mandatory tagging before moving to the next document. For example, a reviewer can move to the next document without applying any coding to a specific document.
We are looking at improving this functionality and in a future version we will provide the reviewer with a dedicated and configurable coding panel to be used for reviewing and coding documents.
-
BackgroundIn version 1.9 we have added the capability to index MS Exchange EDB files, in their entirety or by mailbox. Since then we have increased support to versions 2003, 2007 and 2010, 2013 and 2016. This post will step you through the process of extracting and indexing mailboxes from an EDB file.
Configuration
Before we get into processing EDB files, we need to make a configuration change. Processing EDB files requires more dedicated memory. The Service memory allocation for the case should be set to at least 4GB.Note: Since the lowest recommended setting for EDB files is 4GB, processing EDB files should be kept to systems running 64bit operating systems and with sufficient RAM. 32bit operating systems are limited to using approximately 3GB RAM (even if more physical memory is installed) and therefore the above settings will not work for 32bit systems. You must also be mindful not to set the memory settings higher than what your machine and OS supports. E.g. the total amount of memory used for Service memory allocation is calculated this way. The number you set for Service memory allocation, multiplied by the number of Crawlers. So, if you have say 6 crawlers and 4GB set for the Service memory allocation, then the total amount of memory used will be 24GB. The following is an example for a system with 32GB RAM:
- Keep the 'Memory allocation' setting to Auto.
- Set 4GB for the 'Service memory allocation' setting. Or, higher if you have adequate physical memory installed in the system.
-
Leave the crawlers as Auto.
See this post for more information on the different memory and crawler setting in Intella.
https://community.vound-software.com/topic/434-optimizing-intella-memory-settings-for-best-performance/
This 'Service memory allocation' setting is available in the Case Manager. Click on the case then click the Edit button. Now click on the Advanced button.

Now set the 'Service memory allocation' setting to 4GB, then click on OK to save the settings.
 Processing EDB FilesYou will notice when adding a new source that there is an option for 'MS Exchange EDB Archive'. Select this option and navigate to the EDB file you wish to process.Note: You could use the 'File or Folder' option to ingest EDB data sources however, you will not get the mailbox chooser options with this method.
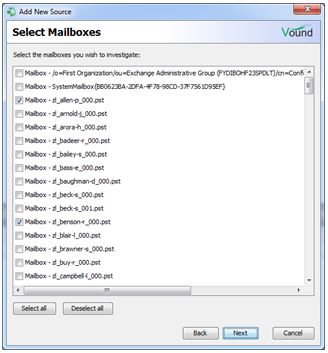
Once the EDB file has been opened, it will display all of the mailboxes contained in the EDB file. Select the individual mailboxes you want to index by checking the desired mailbox check boxes.
From here on, the processing steps are similar to the steps taken for adding any evidence type. On the next window you can edit the source name and time zone information.

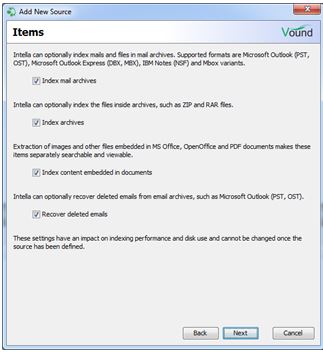
You can set additional indexing settings as required.
The 'Cache original evidence files' setting is useful if the indexed case will be moved to another location for searching, review and export. This allows you to export the original evidence files from the case without having to have the source files available on a separate location. In the case of an EDB file, the extracted mail data is always cached into the case. Caching the EDB file itself will significantly increase the case size and indexing time for no benefit. Therefore you will typically want to turn this off for EDB files.

Post-processing tasks are a good way to run additional search criteria directly after the indexing phase has completed. In this example we will search for the term 'Fraud' and the results will be tagged in a tag named 01 - Hits for 'Fraud'.

Click Next to continue.

Lastly, complete the Add New Source wizard by checking the 'Yes, I want to index this source now' check box and clicking on Finish.
Note: It may take some time before Intella reports any indexed items. The reporting of indexed items is dependent on the size of the file and the complexity of the data.

Once the processing is complete, under the Location facet you will see the EDB source and under that source you will see the mailboxes which were processed.

In my example you can see that items have also been tagged from the Post-processing tasks which were run.

Intella supports adding addition mailboxes from the original EDB file to the same EDB source which is shown under Location. Because the top level source (the EDB file) has already been added to the case as a data source, we can't use the 'Add New Source' wizard to add additional mailboxes. Instead we add mailboxes by selecting Sources, then Edit Sources from the menu. This will show the 'Edit Sources' window.

Select the 'Select Mailboxes...' button which will show a list of the mailboxes in the EDB file. Note that mailboxes which have already been processed are greyed out. Select the mailboxes you want to add to the case and click on Ok.
Note: It is not possible to remove already indexed mailboxes from the case.

Once back in the Edit Sources window you will notice that the Apply button is now active. Select the appropriate time zone then click on the 'Apply' then 'Close' buttons.

A message will be displayed stating that sources have been modified and whether you want to index the sources. Click on Yes to start indexing the new mailboxes.
Note: In version 1.9, new sources or additional selected mailboxes can be indexed later without having to index the entire case by selecting “Index new data” in the Sources menu.

Again, once the processing is complete, under the Location facet you will see the original EDB source. Under the original source you will see the existing mailboxes along with the new mailboxes just indexed.

-
Hi Ed, unfortunately Adam is correct when he says sources can not be removed, this is something that may be in a future release.
The feature you need is in version 1.9 which should be released in a few weeks. With this version you will be able to add say 5 PST files separately to an existing case then you will be able to click on the 'Index new data' button which will only index the 5 new PST sources.
Jon


Proximity search with a phrase search
in Archived threads
Posted
Hi Mark,
Unfortunately phrase searches are not supported in proximity searches.
The reason is because the different search terms in a proximity search need to be enclosed in double quotes. A phrase also needs to be enclosed in double quotes however, you can not have nested double quotes (such as "word1 "spoke to""~5) within a proximity search
A work around for showing all items where word1 is within 5 words of "spoke to" could be done this way:
Note - This work around should do what you are trying to achieve however, there could be some false positives returned.
Regards
Jon